
Tutorial: Create a simple setup
This is a short tutorial on how to get started with MusiKraken. We will create a Keyboard module and connect it to an output module, so that you can play your first notes. And give a few examples of how to make that setup more useful and interesting.
To start, go to the editor view and delete all nodes (you could also go the "Load / Save" menu and click on "New Project", which would create a simple setup with a keyboard for you, but that would defeat the purpose of this tutorial...).
So the editor should look like in the screenshot below: Empty.

Now tap on the "+" sign in the top-right corner.
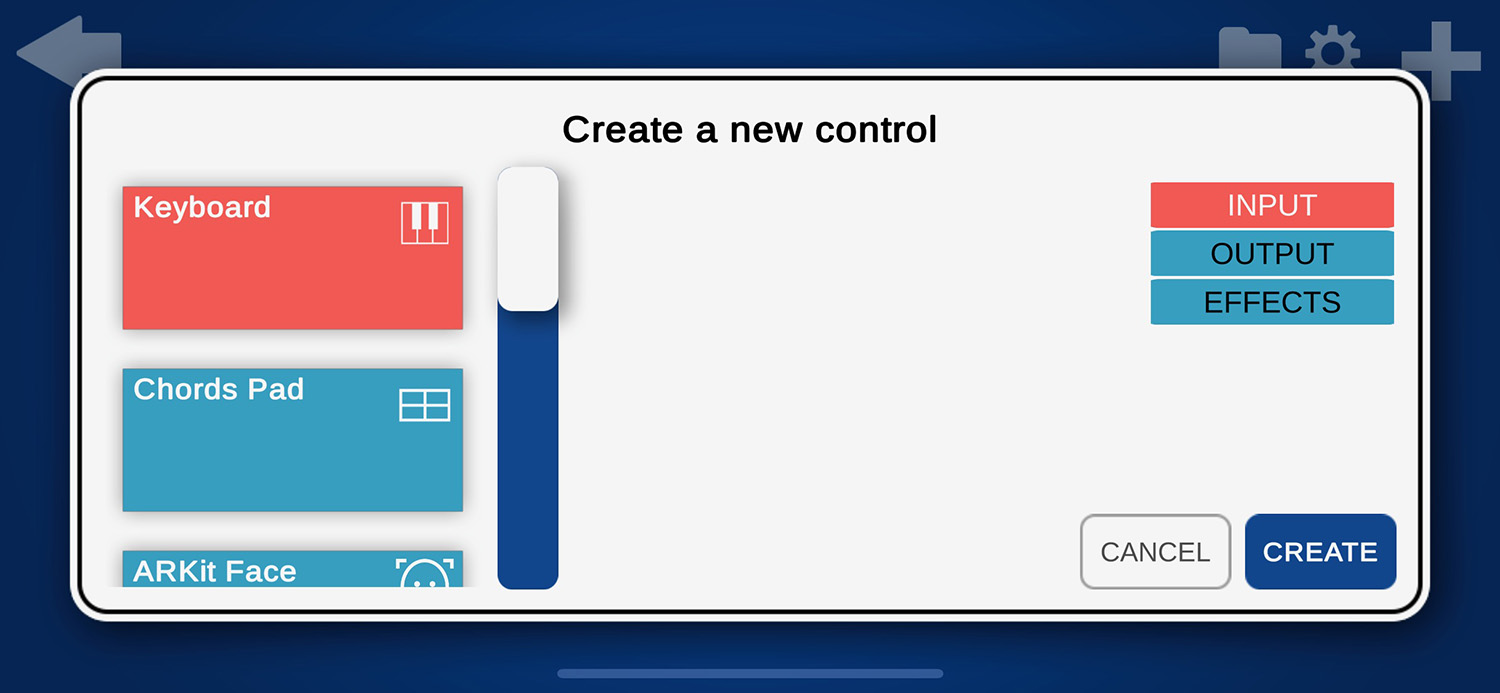
On the three buttons on the right side, select INPUT (if it is not already active), select the "Keyboard" in the list and tap on CREATE.
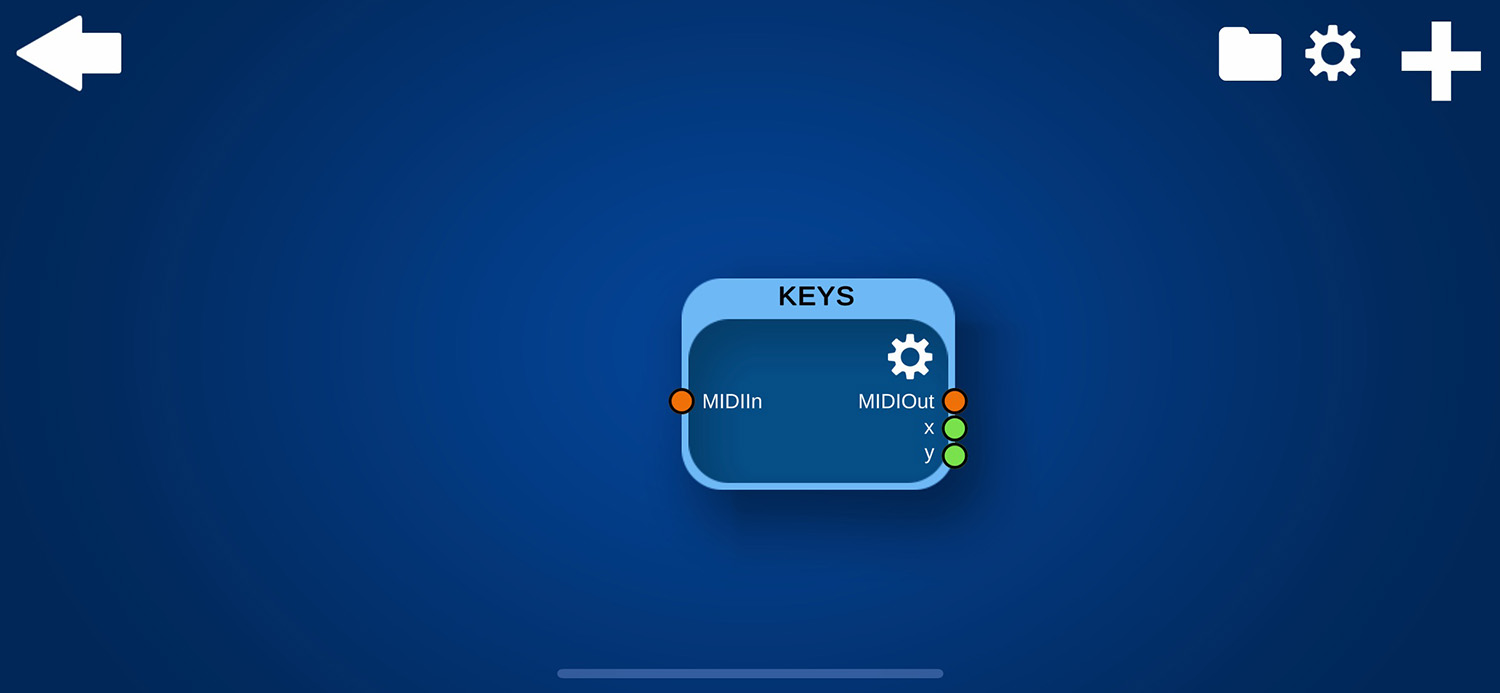
Now you should see a new keyboard node. It has one input port (MIDIIn) and three output ports (MIDIOut, x and y). Next we will need an output module. Tap on the "+" sign again.
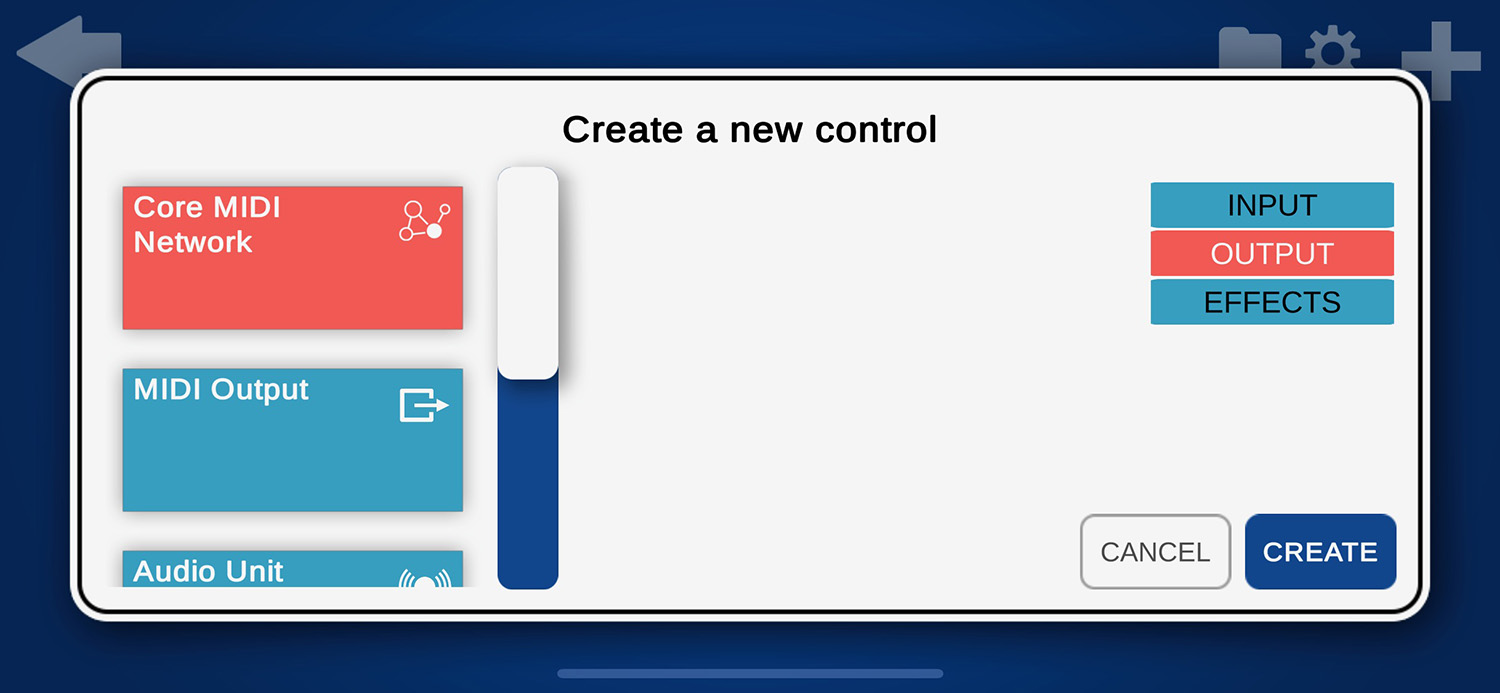
This time select OUTPUT on the right. You should now see a list of possible output modules. You can send the MIDI events either to another device in your local network using the Core MIDI Network module or Snarp Network MIDI (which is my own cross-platform implementation of this), you can send it to a computer connected via the USB cable or another app on the same device that supports background audio with a virtual MIDI connection using the MIDI Output module.
On iOS you can also host Audio Unit instruments, which are synths / samplers that are included in some apps downloaded from the app store.
And I added a very simple synthesizer, called SimpleSynth. It cannot do that much (I am working on a more powerful one that might be included in the app in the future), but is perfect for tutorials like this, because all other output modules depend on which operating system you use, which devices are connected to it, what other devices are in the local network or if you have Audio Units installed on your device.
If you prefer to already use one of the other modules, feel free to do so, but because of the reasons above, I will create a SimpleSynth now.
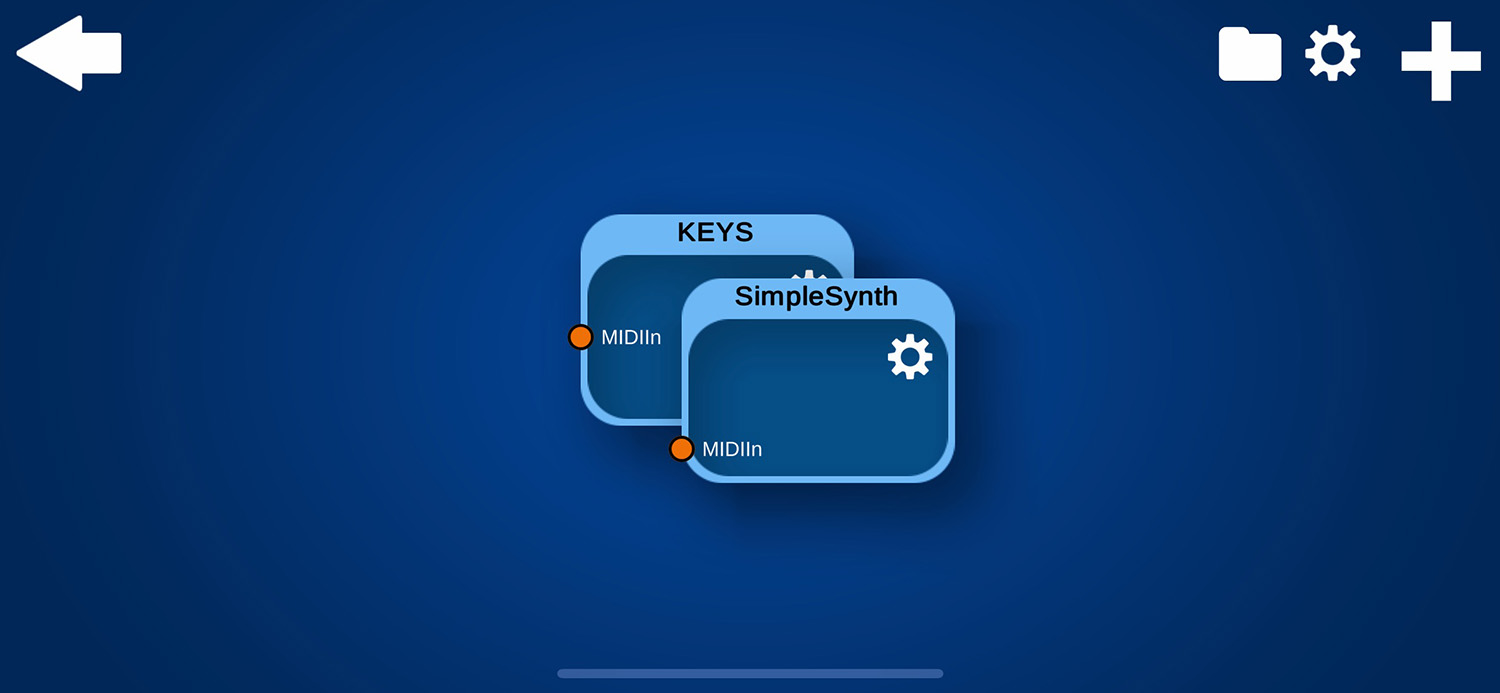
Back in the editor, drag the SimpleSynth module a bit to the right and the Keyboard module a bit to the left. The app is optimized to use a setup from left to right, but you can of course place them anywhere you like.

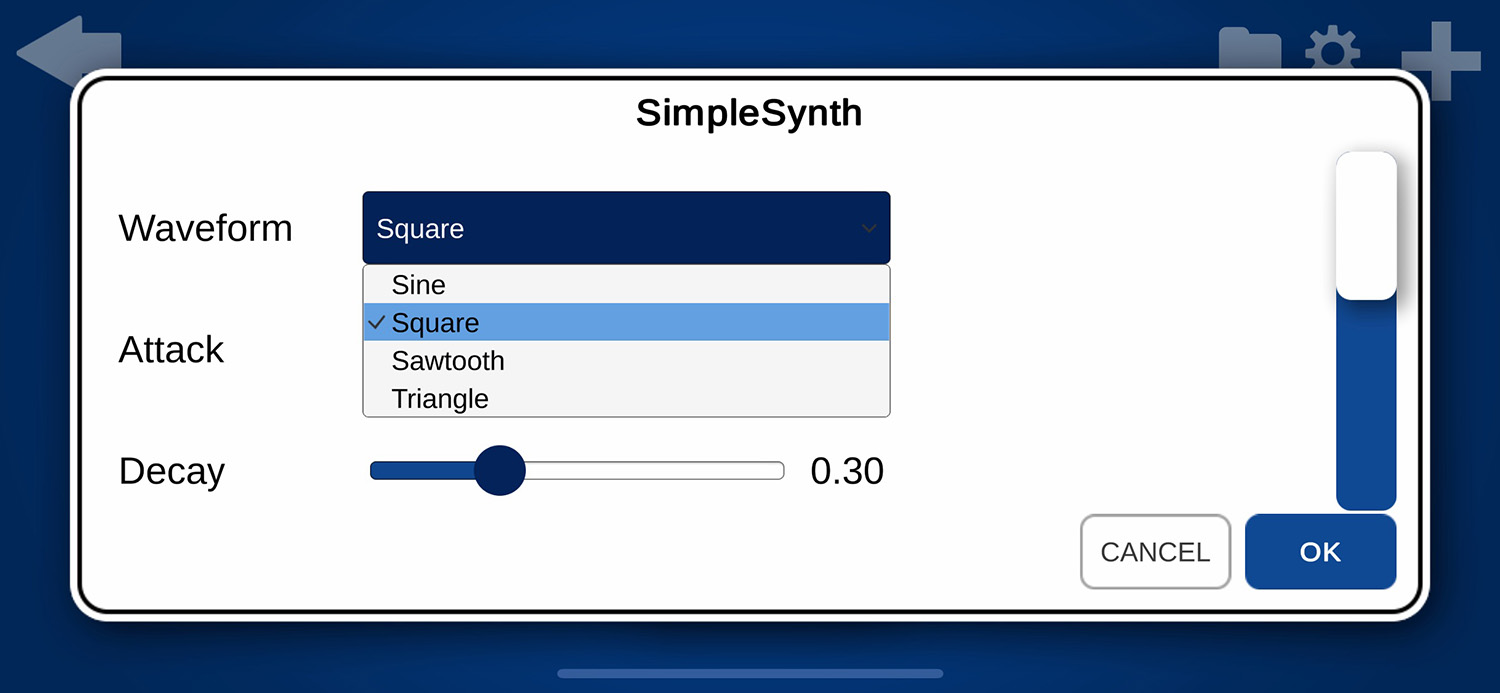
If you want, you can tap on the cogwheel on the SimpleSynth node to see the settings of this. Tap on the Waveform dropdown and select Square (or whatever) to make the sound a bit interesting, just for the fun of it.
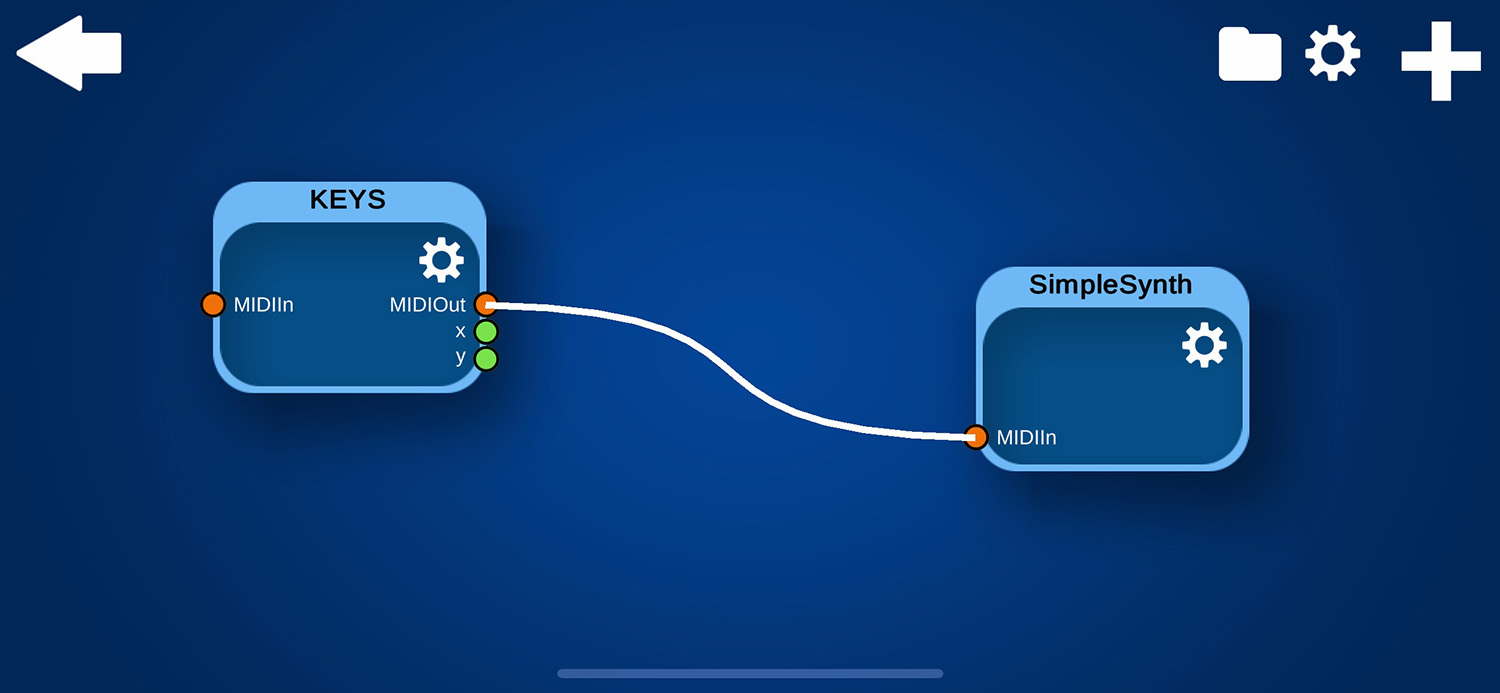
Now touch the MIDIOut port of the Keyboard node and drag it a bit. You should see a line coming out of the MIDIOut port.
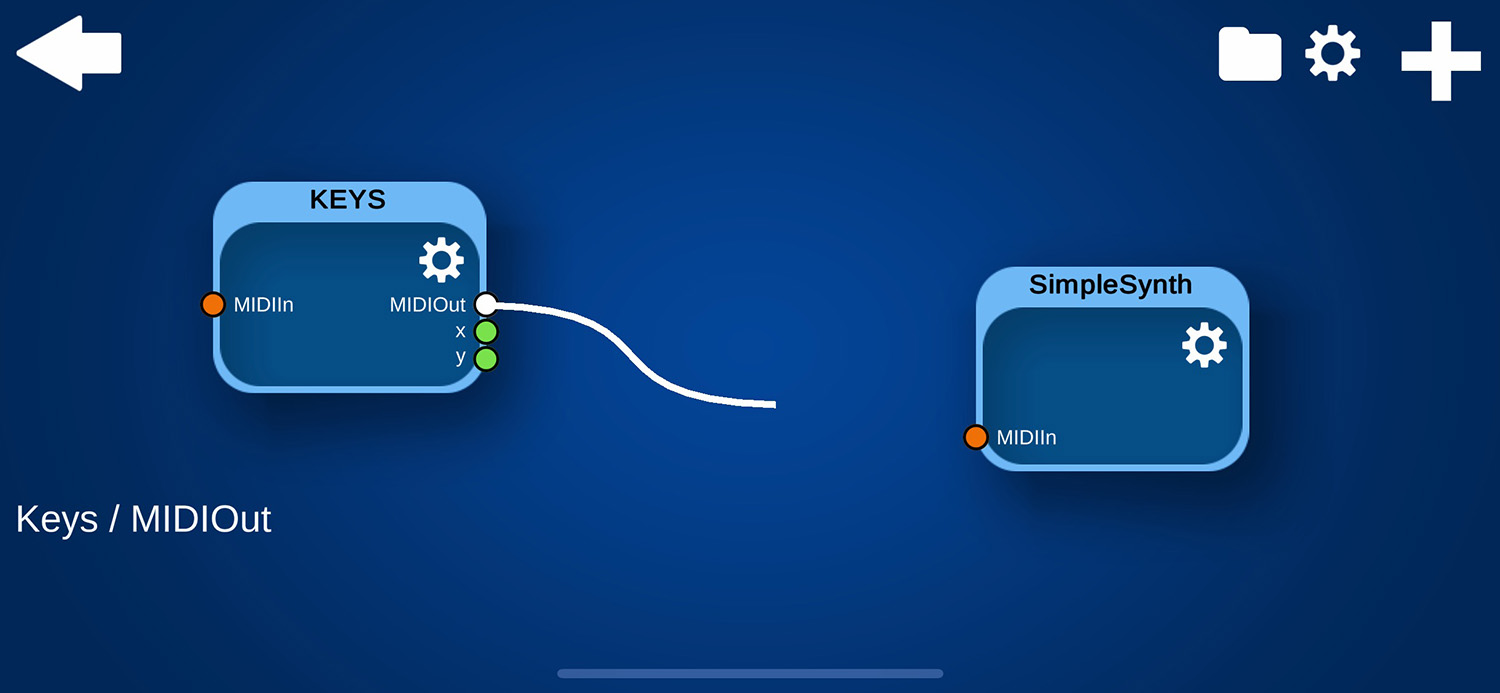
Drag this line over to the MIDIIn port of your output module, and release it when you are over the port. The ports should now be connected.
So every time you press a key on the keyboard, it should create a MIDI Note On event and send that to your output node. And if you release the key, it will send a MIDI Note Off to stop the sound again. Let's do exactly this now. Tap the arrow button in the top-left corner to get back to the main view.
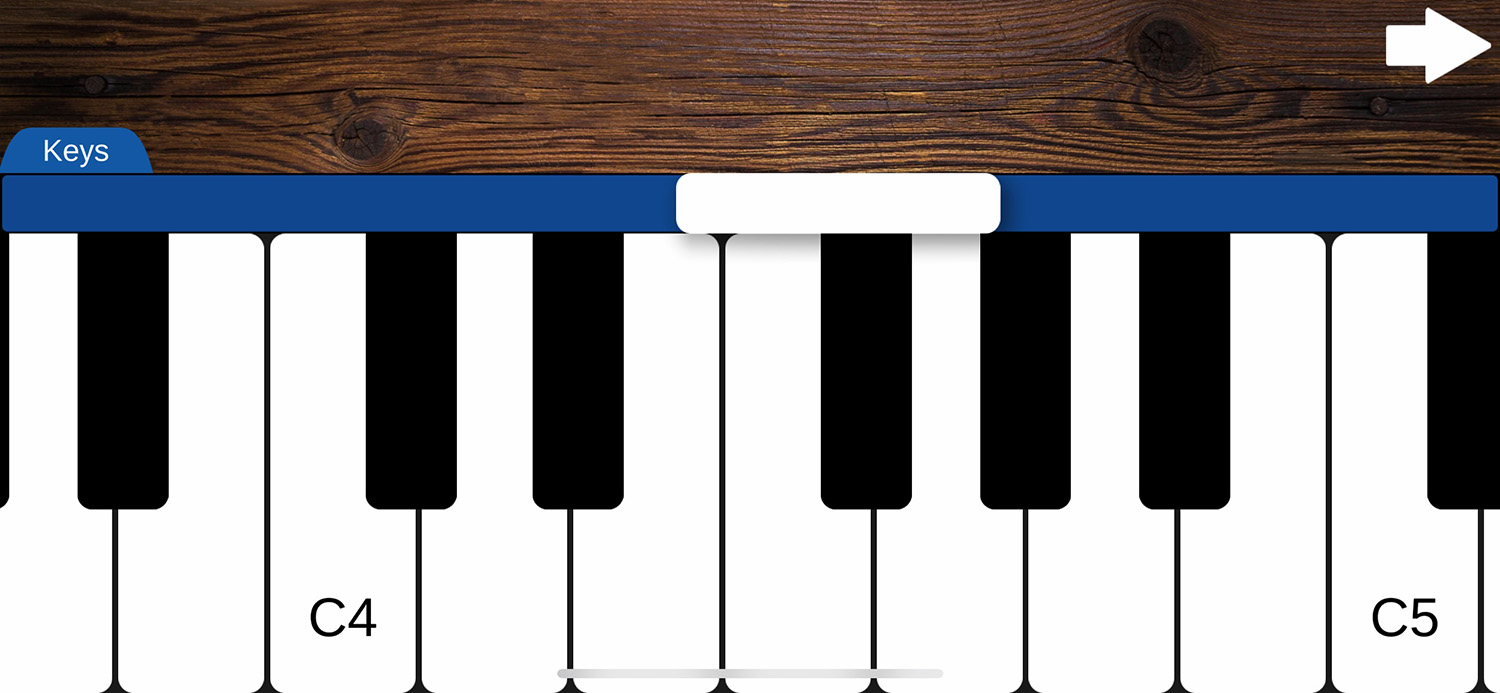
Press a few keys to see if you can hear a sound. If you used the SimpleSynth as I did in this example, you should hear a simple square wave sound. If you do not hear anything, please increase the volume of your device. (If you still do not hear anything when using SimpleSynth, please send me a mail with a description of your device, because that might potentially be a bug :-().
Now that you can play notes, congratulations! You now have the simplest setup possible in MusiKraken!
Ok, it is just a keyboard. Nothing fancy. Let's make it more interesting. Go back to the editor view by tapping on the arrow button in the top right corner. Now touch on the green y-port of the Keyboard node, drag the line over to the MIDIIn port of the output node and release it.
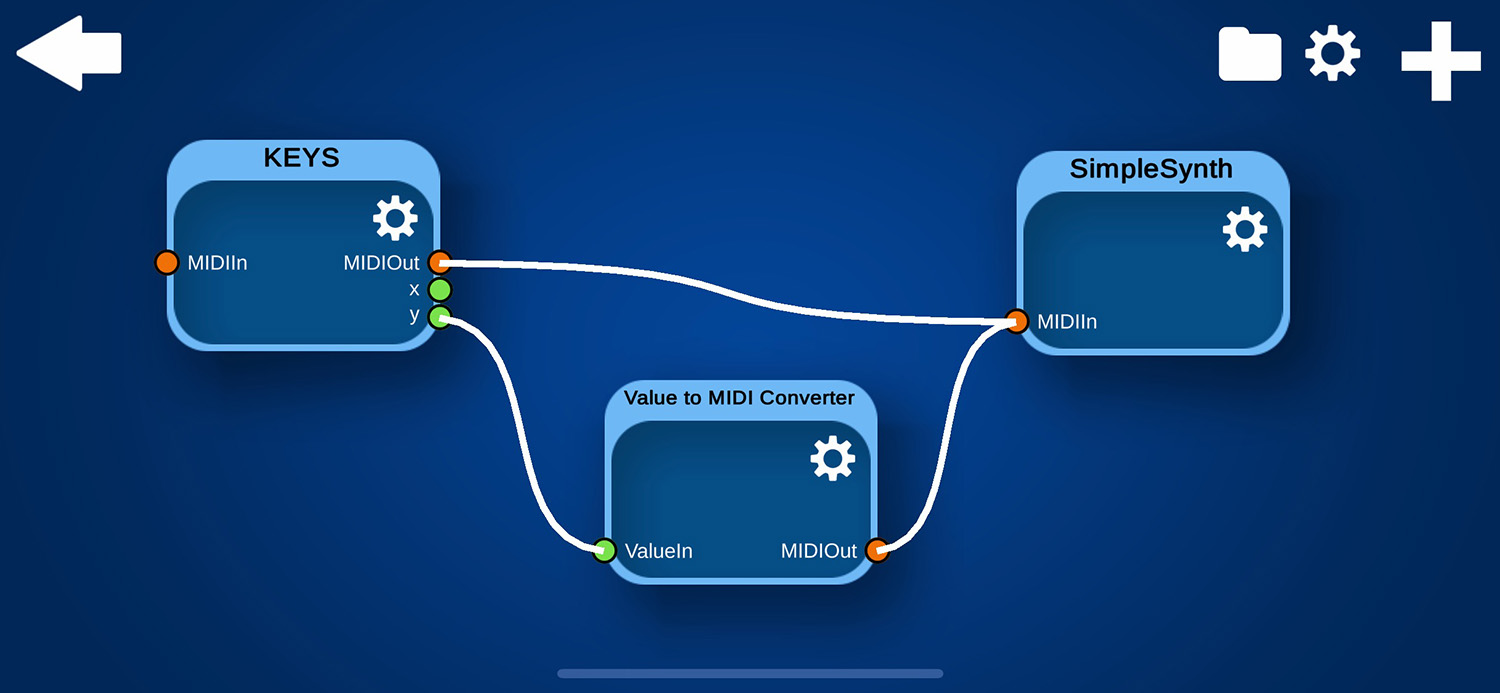
This will create a Value to MIDI Converter. Maybe drag it down a bit so that the setup looks better. The y-port is green, which means that this port sends numerical values. The value that the y-port sends can be changed by sliding vertically (up or down) on the keyboard key. Which is perfect for changing the modulation (= what the MOD wheel does on your keyboard) while playing. Which is why this is the default setting in the created Value to MIDI converter. If you now go back to the main view, press one or more keys and slide your finger up or down, you should hear changes in the sound you create.
Now let us create a second connection. Connect the x-port with the MIDIIn port.
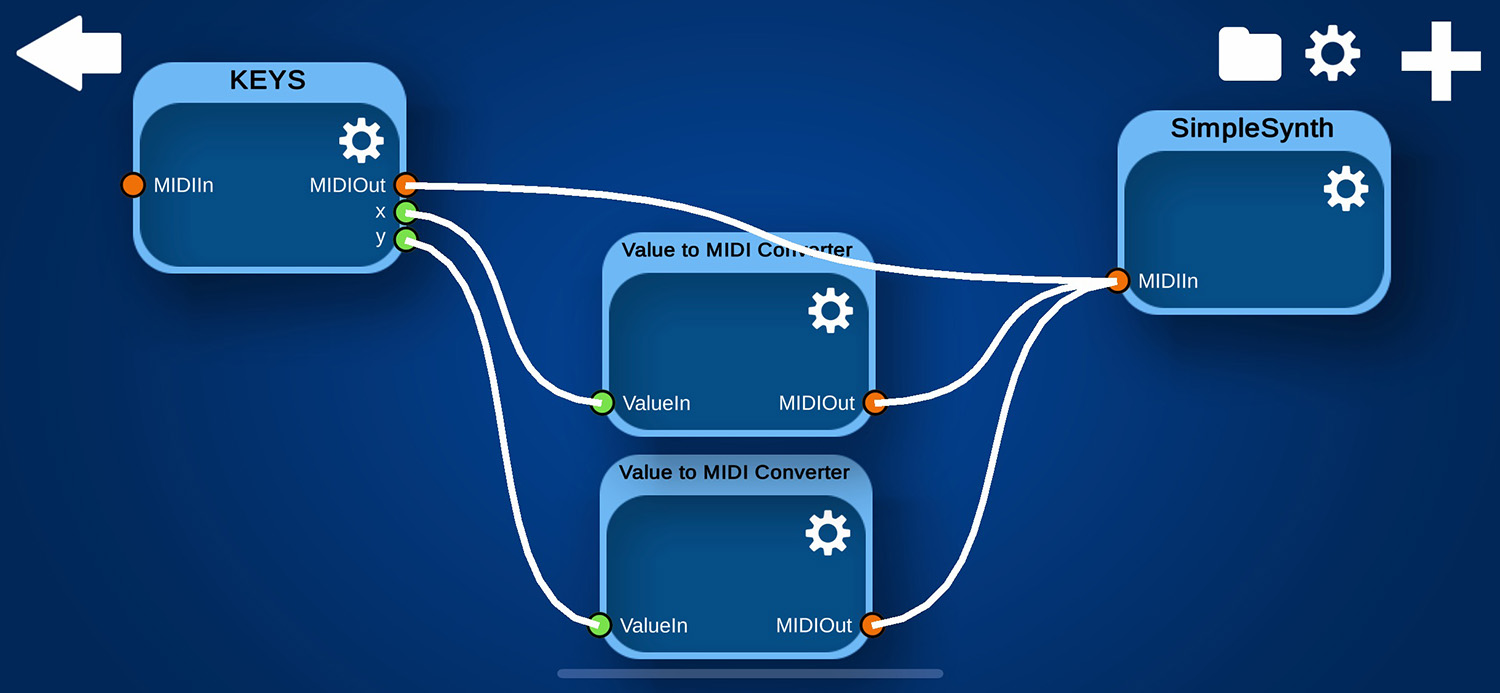
The value the x-port sends can be changed by sliding horizontally (sideways) on the keyboard. By default, the now created Value to MIDI converter also converts this to modulation. Which would be kind of boring, so we can change this. Tap on the cogwheel of the new Value to MIDI converter to show its settings.
The Value to MIDI converter is currently the module with the most settings. You can change on which MIDI channel the generated MIDI events should be sent, the input range (which is automatically set to a useful range when connecting a green to an orange port, but sometimes needs to be adjusted, depending on what you want), you can invert that range so that higher values are converted to lower output values and change the type of the generated MIDI events. And there are more settings depending on the type.
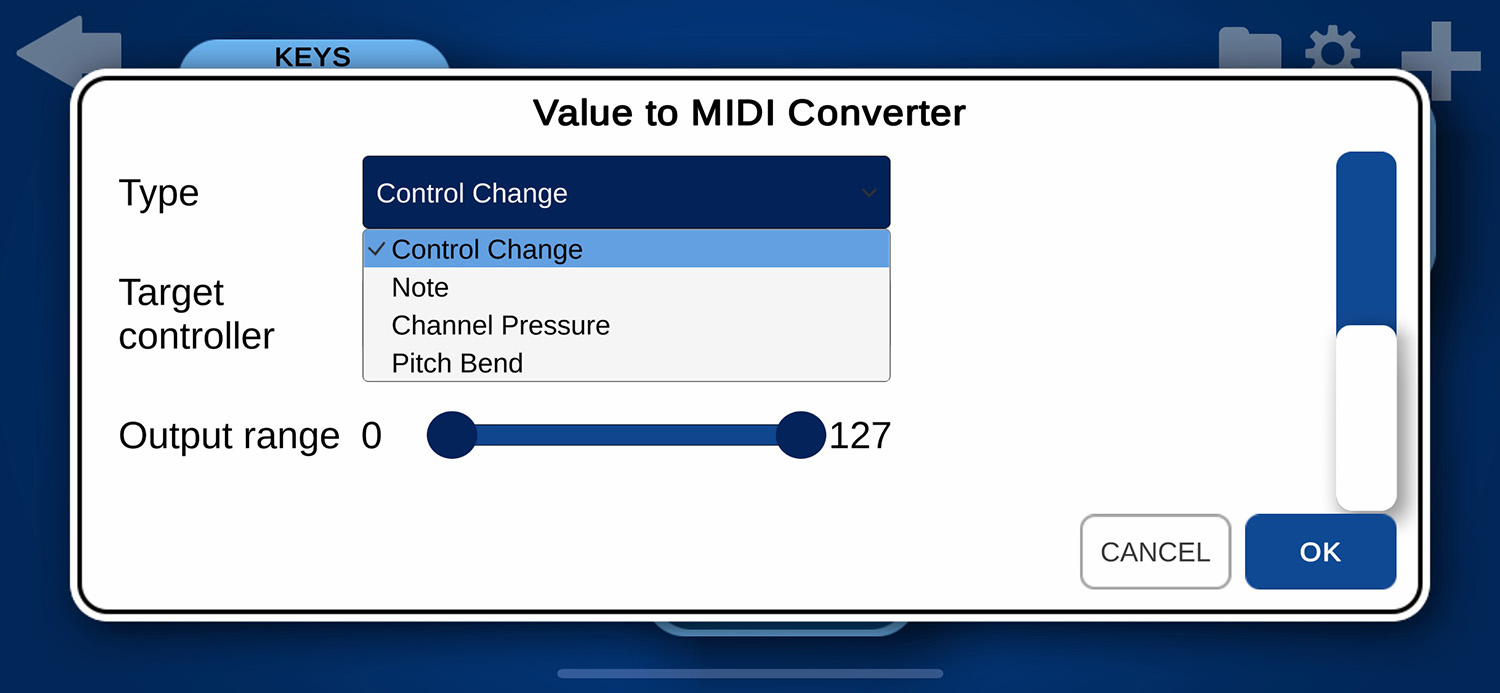
If you tap the type dropdown, you can see that you can convert the input values to Control Change events, to Notes (which will generate Note-On and Note-Off events depending on the input value. So you could make music by pressing the keys on the keyboard and simultaneously play another instrument by sliding on the keys, in this case. Which would probably not very useful for our tutorial?), to Channel Pressure (Aftertouch) events or Pitch Bend events. We will keep the Control Change type. Now tap on the Target Controller dropdown.
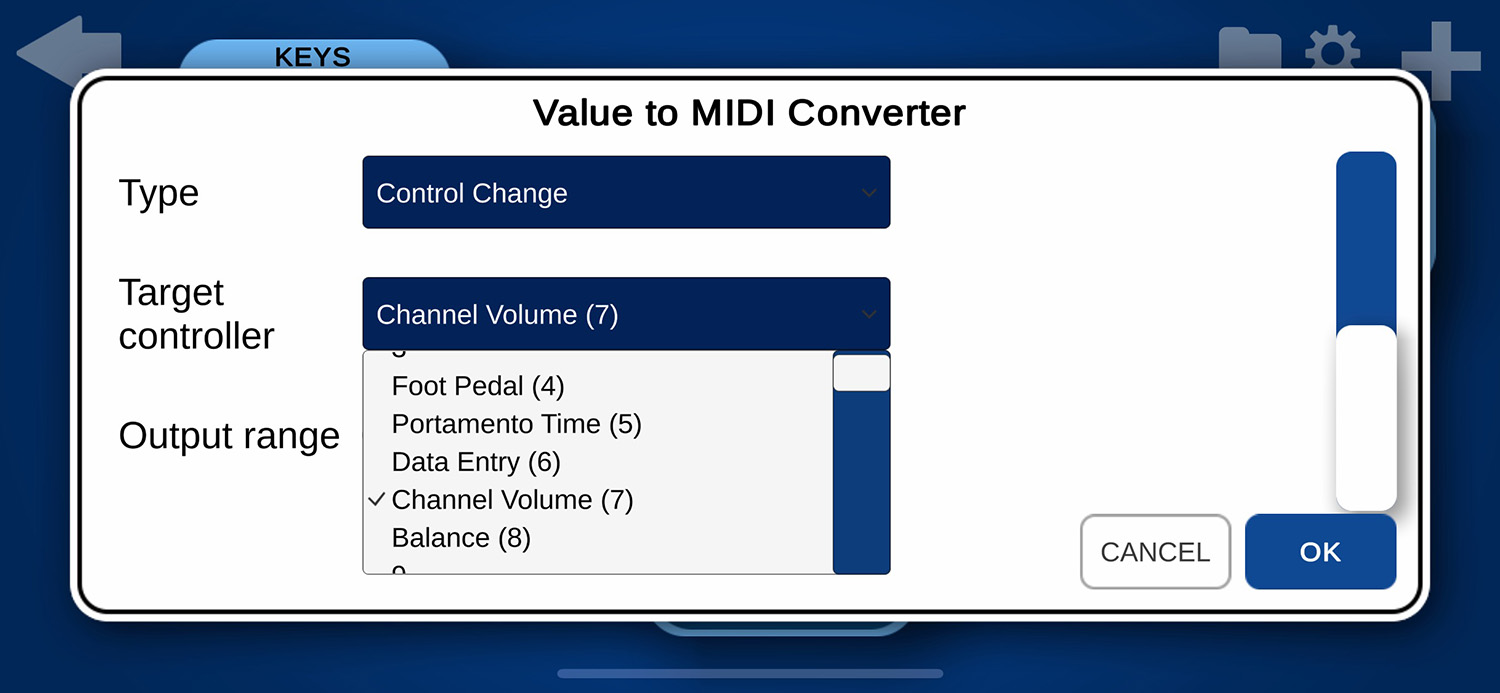
This shows a list of possible Control Change events that can be sent. Which events make sense really depends on the target instrument that you want to control. Check the manual of the virtual instrument or synthesizer you want to control to see which ones it supports. The ones that almost all instruments support are modulation and channel volume. And because SimpleSynth currently also only supports these two types :-|, let us do select that. So select Channel Volume and press OK.
Now if you go back to the main view, you can still change the modulation as before by sliding vertically, but you now can also change the volume by sliding horizontally, all while playing the keyboard.
Ok, maybe you think it is still just a keyboard. And still boring. So why not create something like this?
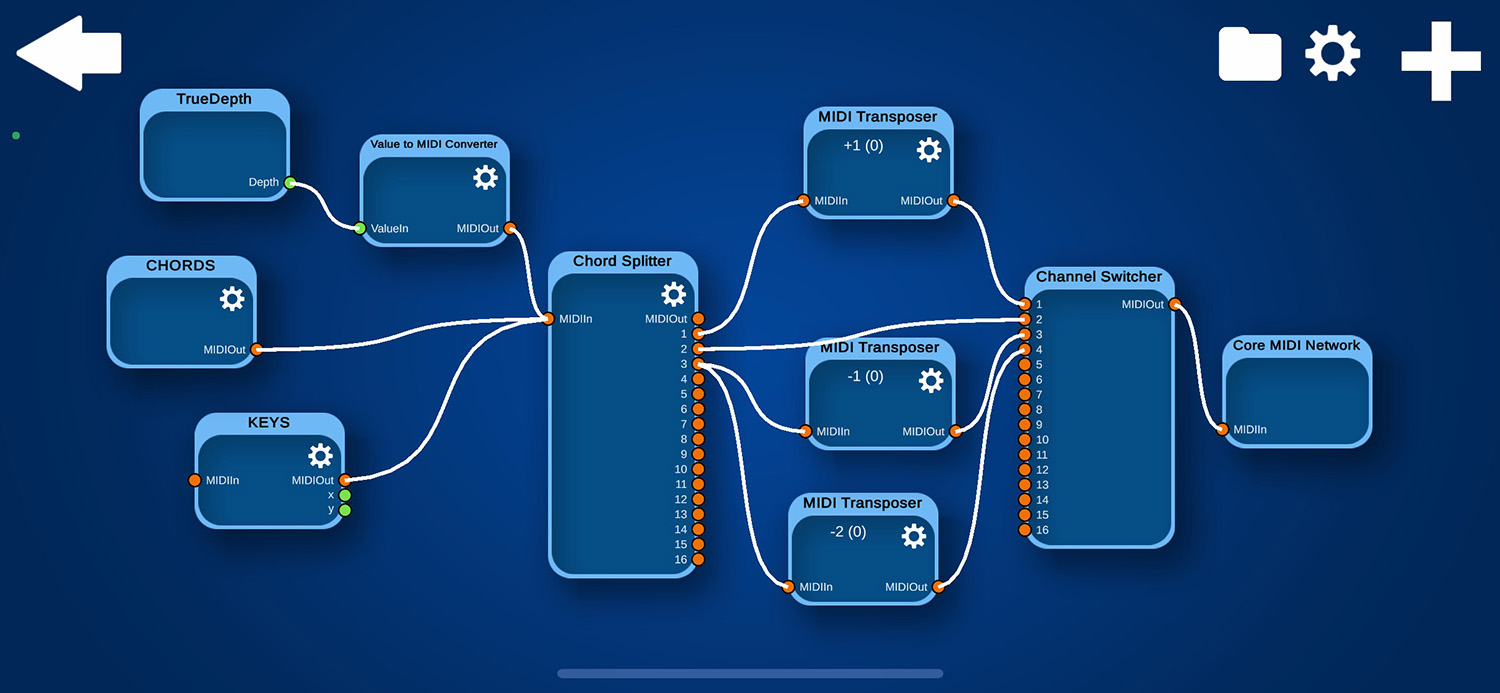
(By now you should know why the app has "Kraken" in its name). Now that you know the basics, you can easily set up something like this. In this example, any notes created by the Keyboard or the Chord Pad are sent to the Chord Splitter. This module splits the chords (after some delay, because pressing all notes on a keyboard simultaneously is a bit difficult, so the Chord Splitter delays this. The delays can be changed in the settings), and sends the highest note out on port 1, the middle note on port 2 and the lowest note on port 3 (this is also settable). Note that in this example only chords with up to three notes make sense.
The notes that are sent out of port 1 are then transposed up by one octave. The note on port 3 is transposed down by one octave, and also transposed down by two octaves, which is then sent on port 4.
And all of that is collected and sent to a computer running a DAW (for example) which might have a violin instrument loaded in a track that reacts only to channel 1, a viola on channel 2, a cello on channel 3 and the cello sound is duplicated by the bass on channel 4. And all of them can be legato, because only one of the notes is sent per channel (with a short delay of the Note Offs to make legato possible, but this is also settable).
Or any other samplers or synthesizers. The above is just an example, you could control a full orchestra with this, or control multiple instances of the same synth simultaneously, it really doesn't matter.
And on the left I also added a TrueDepth module (which is only available on iOS and on devices that actually have a TrueDepth sensor! But this is just an example, you can combine anything). In this case the TrueDepth sensor sends modulation control change events to the Chord Splitter. So you can move your hand (or anything else) further away or closer to the camera to change the modulation on all channels that are currently used in the Chord Splitter.
So in short, in this setup you can control multiple (also legato / mono) instruments simultaneously and change the mod wheel values while moving your hand in the air.
Now go and be creative!