
How to use MusiKraken
Videos
1. How to use the interface
2. How to use the Keyboard
3. How to use the Chord Splitter
Introduction
MusiKraken allows you to create your own, custom, MIDI controller setup. This way you can adjust your MIDI controller to whatever and however you want to control your virtual instruments or synthesizers.
The basic idea is this: A typical MIDI controller has sensors (for example one sensor per key in a MIDI keyboard, or the sensors in the mod wheel and pitch bend wheel). The sensor values are then somehow converted to MIDI events, which are maybe transposed to the correct range, and then sent to another device via cable, WiFi or Bluetooth. The other device will then receive the MIDI events and generate sounds based on that information.
The app basically works the same way: You create one of the many input sensors available in the app, create an output module and maybe some effect modules, and connect these to generate and send MIDI events.
MusiKraken is completely modular. That means each module doesn't care about where the MIDI event or value comes from. All values from sensors are converted to a range between 0 and 1 (and you have control over the conversion). This way each module can act on its own, and doesn't care if the data comes from an external MIDI controller or any of the internal modules. You can simply connect anything to anything else and see what happens (the downside of this is that I have no way to test every possible combination. So if you find a setup that crashes the app, please send me information on what you connected so that I can fix it!)
The Modules
Inputs
The app tries to support any sensor that is available on your mobile device. Your device for example has a touchscreen which supports multiple touches simultaneously. Or it has motion sensors (Accelerometer, Gyroscope and Magnetometer) which can be used to get the current rotation or acceleration of the device.
Most devices have at least one camera. MusiKraken allows you to track your hands, body and face and colored objects in front of the camera. On iOS, it also supports barcode and animal tracking. Some iOS devices also have a TrueDepth and a LiDAR camera, which can be used in MusiKraken to also track the distances accurately.
And the internal microphone can be used to detect the pitch and amplitude of any sound.
MusiKraken also supports devices that can be connected to it. iOS, Android and web browsers all support connecting Game Controllers to it. MusiKraken allows you to assign notes to each Game Controller button and use the motion sensors, haptics and lights of Playstation controllers.
On iPhones, MusiKraken also supports motion sensors, touch, digital crown and the heart rate of connected Apple Watches. And on iOS, you can use the motion sensors of AirPods as inputs (when available).
Most input modules do not generate MIDI events directly. They instead output each sensor value on a separate port. This allows you to define yourself what MIDI event should be generated by which sensor parameter, or use the values for more complex combinations. This way you can for example use your mouth (when using face tracking) to generate notes in a specific scale, or control modulation (or any other Control Change value) or pitch bend.
Some input modules already combine the sensor information in a meaningful way and also output MIDI events directly. For example the Keyboard module generates MIDI notes for each key and can use the multi-touch information to generate MPE events. But you can still use the touch position and radius separately as values to define what should happen when sliding or pressing down on the keys.
Outputs
MusiKraken tries to support as many MIDI transports as possible. Luckily, iOS already supports MIDI via WiFi and Bluetooth natively, and also has a way to send MIDI via USB from iOS to a mac. On iOS, MusiKraken also can act as an Audio Unit host, so it can host AUv3 plugins directly inside the app.
On both iOS and Android, the MIDI Output module allows you to send MIDI events to other apps on the same device. On iOS, you will also see the Network port and any connected Bluetooth devices in here, as CoreMIDI combines them all into one interface. The MIDI Input module allows you to receive MIDI events from other apps on the same device, and also from connected MIDI controllers.
On Android, the native support is a bit limited, and really depends on the device and the manufacturer. But to still support devices that have no official support, I added my own implementations of RTP-MIDI (= protocol for MIDI 1.0 via WiFi) and Bluetooth MIDI (on Android, all the output modules and the keyboard module are free, so that you can test if your device supports anything useful for you. But at least MIDI via WiFi should work on almost all devices).
Since MusiKraken won a MIDI Innovation Award in 2022, I have also been a member of the MIDI Association and started implementing MIDI 2.0. MusiKraken so far (at the time of writing this, in 2025), supports basic MIDI-CI, can send high resolution and per-note MIDI 2.0 events and was one of the first product worldwide to support Network MIDI 2.0. So if MIDI 2.0 support is enabled (in the general settings), you can also send MIDI 2.0 events via WiFi and to other apps (if your OS version is new enough to support inter-app MIDI 2.0).
Effects
To allow you to really be creative when combining the sensors with the output, MusiKraken has all kinds of MIDI effects.
Some effects simply change the existing MIDI events. For example, the Transposer adds or substracts a value from the notes to transpose the notes to a different range. There are also modules that change the target channel of the MIDI events, or the velocity of note events.
Other modules act on incoming numerical values sent from the sensors. For example the Threshold module starts playing a note if a value goes above (or below, depending on its settings) a specific input value. Or the Beat module plays a note when the value changes fast enough. The Speed module computes a new output value depending on how fast the input value changes, and the Distance module has two pairs (x and y) of input ports, and computes the distance between these two points in space (for example if you want to trigger a MIDI event based on the distance between two fingers in Finger Tracking).
There are also more complex effects, like the Arpeggiator, which arpeggiates over the notes of an incoming chord. Or the Chord Splitter, which splits incoming chords into separate notes, sorts them according to the pitch of the note (with a settable delay, to make this more accurate) and sends each note out on a separate channel and port. This way you can control multiple instruments simultaneously and create very complex setups.
The Interface
MusiKraken has two views: The main view, where you interact with the many input controls, and the editor screen where you create new modules and combine them. The idea is that you create and connect modules in the editor view, and once everything is set up, you change to the main view to make music.
The Main View
On the main screen, you can interact with the controls, see the values of the various sensors or look at the camera image and see what is being detected by the active camera modules. What you see here depends on your setup in the editor view, but the basic layout is the following:
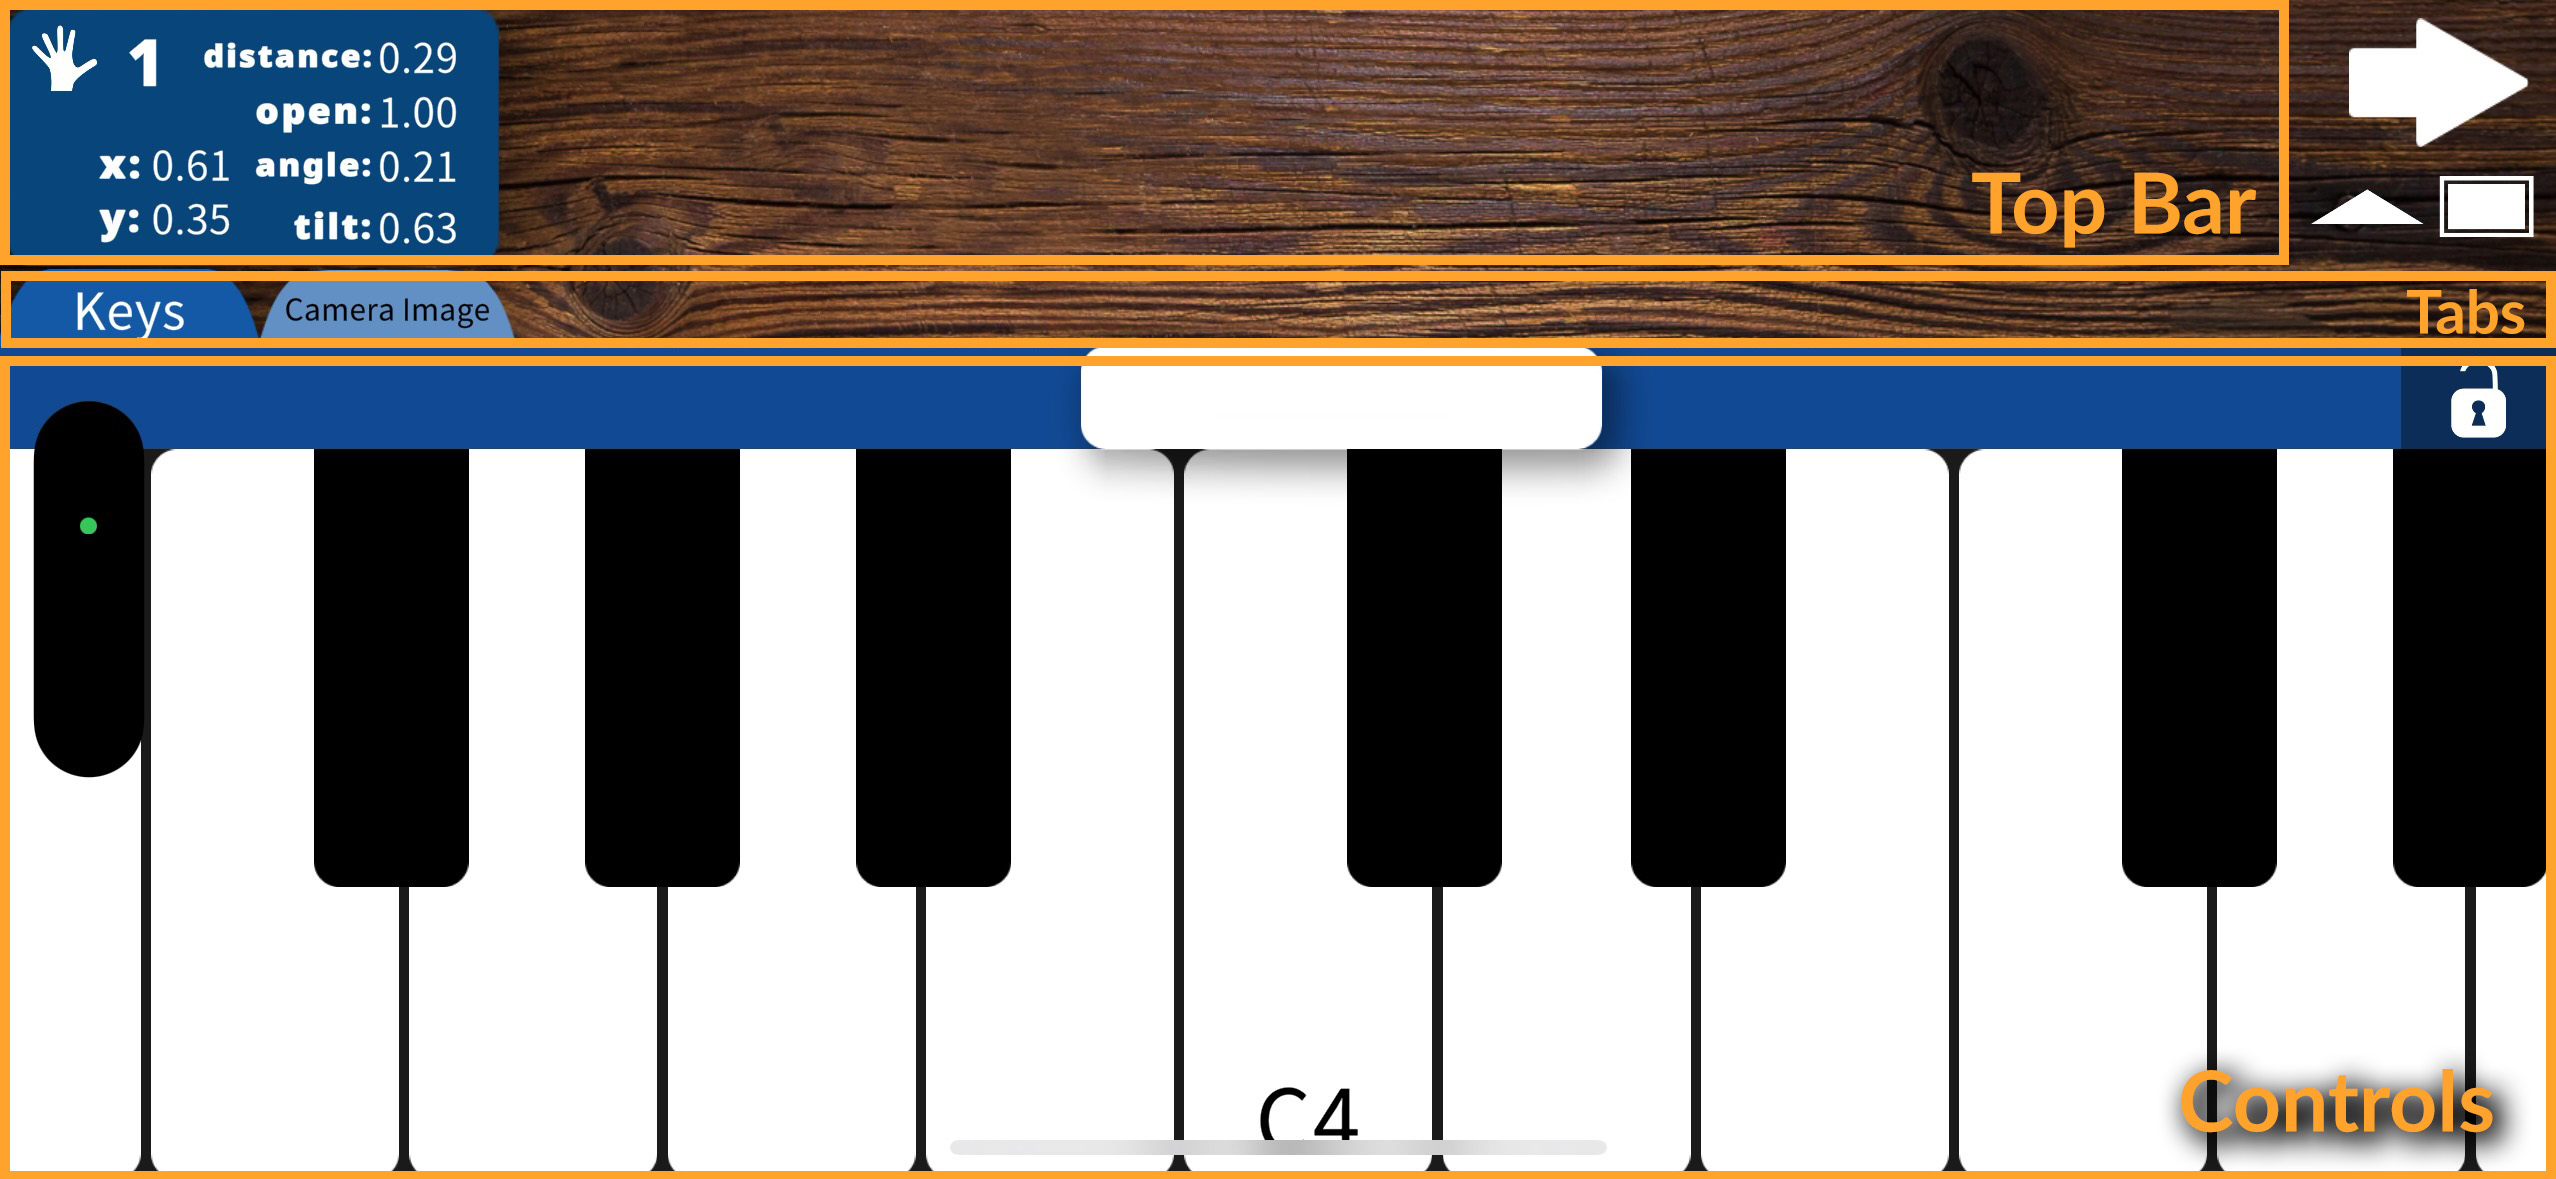
On the first row on the top (called "Top Bar" in the screenshot), you will mostly see panels of controls that provide information that might be useful while making music. For example, each control that uses sensors other than the touch sensor (so microphone, accelerometer, TrueDepth, hand tracking, face detection...) has multiple ports with values that change while interacting with the sensor.
In the example image above, you can see the panel that shows up when you create a Hand Tracking module. In this case, if you move your hand in front of the camera, it will change the x- and y- values depending on where on the camera image your hand was detected. And the open value will change depending on the distance between your finger tips and your thumb tip, so putting all the fingers together will decrease it, while spreading the fingers apart increases it. This way you will know the current values and can adjust the range in the editor view to whatever works best for you.
If you tap on the triangular button on the top right, you can hide the Top Bar. This way you get more space to interact with the controls below.
Next, there is a row containing the "Tabs". These belong to the "Controls" area below and let you select which of the controls you currently want to interact with. The name on some of the tabs can be changed in the settings for the modules on the editor screen, this way you can for example have multiple active keyboards and can differentiate them by name.
Note that if you do not like the order of these tabs, you can drag them to change that. This also works for the Top Bar items above.
In the "Controls" area, you will see the views of the Keyboard or the Chords Pad (more to come...).
Tap the arrow button on the top-right corner to get to the editor screen.
The Editor View
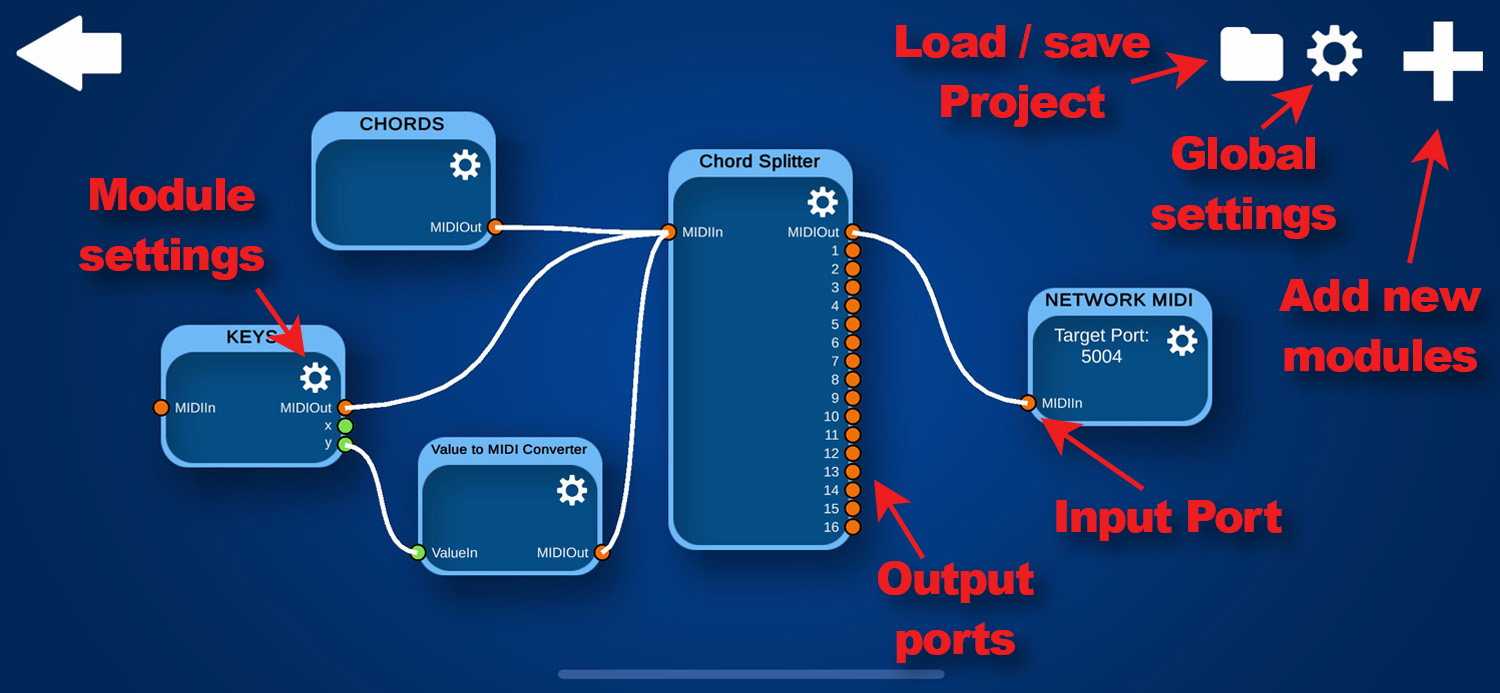
The editor view lets you create new modules and combine them.
To create a new module, tap on the "+" sign in the top-right corner. This will open up a menu where you can select one of the "Input", "Output" or "Effects" module. Tap on "create" to add it. You will always need at least one input module and one output module, and connect their ports, otherwise nothing will happen!
On the right and left of the nodes of the created modules in the editor, you will see the ports. On the left of a node are its input ports, and on the right its output ports. To connect an input with an output port, touch the port and drag the now created line to the other port. To delete a port or a node, tap on it and a menu with a "delete" button will appear.
There are orange and green ports. The orange ports send or receive MIDI events, and the green ports send numerical values. If you connect a green output port with an orange input port, it will automatically create a "Value to MIDI converter" in between the connection, in which you can define how the numerical values should be converted to MIDI. This way you can create multiple connections from green ports and configure each connection separately.
The "Value to MIDI converter" allows you to convert the values to MIDI Control Change events (modulation, channel volume, expression...), to MIDI notes (or chords), to Channel Pressure (Aftertouch) or Pitch Bend values, so you can configure everything however you want.
Some of the modules have settings. You can access the settings for each module by tapping the cogwheel symbol on their nodes. For example for the keyboard, you can set the key widths, can activate scale highlighting or set if the key should change if you slide to another one, plus much more.
You can drag the nodes around to change their location and you can use two fingers to zoom in or out of the view. To get back to the main view, tap the arrow in the top-left corner.